Showing posts with label DIY. Show all posts

Thursday, February 5, 2015

Create and Collaborate: Blog Launch Project


The original plan was to host another themed dinner with a few friends in the next couple of months like what I did last year. I hosted an American themed dinner and invited a few local bloggers in Cebu to come and dine with me with a few friends. You can check the details of it and the menu from Rea's blog at Blissful Snapshots.

This year's dinner is a little bit different. Rea has recently updated her domain from ReaAlducente,com to BlissfulSnapshots.com so instead of a normal themed dinner I am excited to say that we are doing a Collaboration to launch her revamped blog and celebrate it with a bang. 

Hundreds of ideas floated my mind and I am too excited to execute them all. The best part is we get to do it on a budget. No lavish concepts, no expensive venues and no out-of-this world expenses. The menu I planned will still push through and I will blog about the event after. Here's a taste quencher of what the Menu holds.


Fancy, is it not? Teehee.. If this post was on Instagram I would've hash tagged words such as DIY and Dinner. If this event pushes through It'll be the first big event I have hosted or co-hosted ever. Wish us luck and stay tuned for the result. 

Let me know if you have suggestions or any tips so I can incorporate them as early as this month and let me know if your hosting any dinners or brunch anytime soon so I can look out for it.. :) x.o.x.o

Monday, June 30, 2014

DIY: Pendant Lamp


DIY: Pendant Lamp


Our office had a "Themed Wedding" activity last week and everybody participated. They decorated the entire 12th floor and the people getting married dressed themselves in garments with flamboyant colors. One of the spine was decorated with a tribal-like design using tissue paper rolls and  red paper as tiki torch light. I, however, saw a different use for those tissue paper rolls.

I got some tissue paper roll from the office (they had lots to spare). I glued them together and cut four rectangles opposite each other and three circles at the bottom. Then I lined the inside with parchment paper. I ran to a bump on the road when I got to the wiring part and I had to call my dad for help and thankfully I was able complete it in just one day.


Pendant Lamp
Find a project that you like and have a DIY weekend.

Follow me on:

Insagram: alicbalmes
Twitter: @alicthegreat
More DIYs coming soon and stay tuned for my bedroom renovation. :)

Thursday, May 8, 2014

Jade's Cook Book -Ravioli a la Pobre


Jade's Cook Book

Jade's Cook book is dedicated to our dog who inspired us for many years and made us happy when times were boring or sad. Jade was named after the four of us.

J - Jewel, A - Alic, D - Dirk, E - Eugene


Ravioli a la Pobre

Ingredients:

Dough - 
  •    2 Eggs
  •    1 Cup of Flour
  •    pinch of Salt
Filling - 
  • Sauteed ground beef/pork/chicken
  • Grated Cheese
Sauce - 
  • Del Monte Filipino Style Spaghetti Sauce

How To:

Mix the Eggs and Flour until it forms a dough. Roll the dough into a ball and set aside for an hour or two.


Using a rolling pin, roll the dough until its thin enough to cook but not too thin that it will break when you put the stuffing in.


Cut the dough in circles ( i used the bottom of a plastic water cup so the shape is wide enough. Mixed the meat and cheese together and place a teaspoon full of stuffing on one of the circles then place another one on top. To close the ravioli you can use a fork and it should look something like this


Make sure that when you close the ravioli you do not leave any air pockets. Leaving air pockets will cause the ravioli to bloat and pop while boiling. Taking a pot with water and boil the water with a pinch of salt and a table spoon of oil.


Heat the sauce and add any ingredients you prefer. add the cooked ravioli and voila! Enjoy.


Cooking Time : 3-4 minutes
Prep time: 20 mins
Dough: 1 hour and 30mins


Stay tuned for the following post:

Hong Kong Day 3: KidsRus - Hong Kong Disneyland
Madame Tussauds: The Wax Museum (The not so scary version)
Hong Kong Itinerary - Sister Made Stuff

Saturday, March 22, 2014

Sock Hamper in 30 minutes or less


Sock Hamper

Talking Points

Have you ever washed your clothes before and before washing them it smells like feet? Well smell no more! with the easy DIY Sock Hamper. 

With the revolutionary Sock Hamper you get the chance to separate those smelly sock you take off everyday and not place it in the same hamper you put your used clothes in. As an added bonus the Sock Hamper helps you avoid losing the other piece of the pair. Here's how you make one.


Things you will need:
  • a pair of old pants
  • needle
  • thread
  • scissors
  • a ring of sort 
  • little to no sewing skills
  • 30 mins from your day

DIY: 


Take a pair of jeans that you no longer use or does not fit you anymore and cut one of the legs
This is how it should look like after cutting one of the legs
invert the piece and sew the end part as well as the flapped opening

after sewing the ends and opening this is how it should look like when you flip it over
add the ring on the pointy end and voila - Sock Hamper


Enjoy your new Sock Hamper and stay tuned for more DIY project. 


Sunday, October 6, 2013

DIY: Mug Cakes Galore

Cooking Session With my Sister


Our version of the Mug Cakes


Disclosure: Please be warned that I am wearing short shorts here. LOL.. 

This was during my last vacation at home. My sister and I made tarts and cakes for my parent. We had sooo much fun.. so here's the short cut version of what we did. 

the patisserie


Make one too and let me know how you did. Quick Tip? It's more fun if you share the moment with friends or family. (or both) :)

Saturday, October 5, 2013

DIY: How to make your own KITE in 30 mins

DIY: KITE

Simple Childhood Kite (I am not an endorser of SM)

Remember when you were a kid and you had so much FUN with your friends? Yeah i remember mine too. Nothing else mattered BUT to have FUN. No bills to pay, no work to go to, no worries on food cause it magically appeared on the table every morning, noon and dinner (thanks mom) and no matter how much fun you make the only thing you had to remember was to go home before the sun goes down. I remembered 1 of my best childhood memories back home today. During Summer, my friends/neighbors and I would go out and just play. Back then Cellphones, Consoles and the Internet was not yet popular. This particular memory was when we made our own kites from things we found in the house and flew them up high. So today I decided to make a kite and I'll fly it tomorrow morning. (I was planning to do it next week but a few friends from Facebook made me realize that making my own kite is fun so i decided to make it today)

First: What you need


  • Barbecue Sticks or anything like it
  • Glue
  • Cutter (please be careful using this, ask an adult to help you if you are 14y/o or below)
  • Plastic Bag
  • Thread or Strings
  • Pen

How To:


First you have to tie 2 sticks together. If you have a longer stick you cut it to your preferred length. Use the cutter to make the ends look like the picture below, then use the string or thread to tie the two together. Make 2 of this.

Once you have 2 sticks together. Tie the 2 to make a cross.


Place the cross on the plastic bag and cut a diamond shape like the one below.
After cutting out the diamond  shape tie the points of the diamond to the ends of the sticks. Remember to put glue after tying so it wont get loose. Then poke 2 holes where the string should be, add tassels and your good. Try that baby out.. 

Imma fly my kite tomorrow since its 2:20am here in The Philippines...

Let me know how your day goes when you fly your kite. :)

Sunday, September 22, 2013

How to Host a Themed Dinner


It has always been my dream to live like a van der Woodsen or a Waldorf ever since I watched the Gossip Girl Series. Though I am not that fortunate to inherit the looks, the body and the bank account, I did inherit something much more fulfilling, PERSEVERANCE. To "feel" a little bit like Blair and/or Serena I planned to host a dinner party at my place.

Below is a list of tips and guides based on what i did last weekend for my American-Themed dinner party

Tips:

  1. Never bite off more than you can chew - Do not over and under estimate and always make sure you have a plan B (B for Blair.. teehee). Make sure you have resources and location already covered.
  2. The Guest List is like the Ten Commandments - Always make sure that you do not commit mistakes when listing the people attending your shindig. One thing I learned when it came to the guest list was to never invite people that makes you scared, insecure, nervous and/or uneasy, it ruins your night and you'll be focusing more on the mistakes rather than enjoying the night with friends and family.
  3. Decide on the Theme or Menu at least a week in advance - the theme is important because it sets the mood and the Menu fulfills the mood (teehee). When it comes to the menu, always have a plan B so your world doesn't end when the ingredients fall apart.
  4. Clean you Place - have a general cleaning the day before so you won't have to worry about it on the day of the party.
  5. Prepare everything at least an hour before - more than an hour everything gets too cold and just in time doesn't leave you enough time to take a shower and prepare yourself.
  6. One of the main reason why people don't like to host dinners or party is the clean up - what i did was clean in between. If I'm waiting for something to boil, i cleaned the pots and pans that I already used.
  7. One more thing... HAVE FUN... its supposed to be a gathering of friends and family... relax and enjoy.
I found that Carbon (a local market place in Cebu) is the best place to shop for meats and vegetables and pretty much everything else for a steal but if you prefer to get them from big stores like SM, Ayala, Metro Colon or anywhere else then that's fine too as long as you get everything you need.

The MENU

The Burger - Mixed Meat Patty (Beef and Longganiza, salt, pepper and rosemary to taste), Caramelized Onions, Cherry Tomatoes, Button Mushrooms, Lettuce and some Cheese
Sweet Corn (tip to make the corn more sweeter - when boiling the corn add a tablespoon of sugar)

One of the best seller for the night - quartered potatoes boiled, then seared in olive oil, butter, a dash of thyme and flat leaf parsley
Second best seller that night is the Sun Cooler. Orange Juice with sliced real fruits (Watermelon, Orange, Apple and Calamansi) - Mooon Cafe inspired


It was a Fun night and I really felt like one of the characters in Gossip Girl. Check out the blogs below to see how they felt when they got invited to my Elite (ahem) soirée.


Off to my next Adventure... Japanese, French or Zombie.. teehee.. I don't know.. What do you think? Let me know.. :)

Thursday, September 12, 2013

My very own Bucket List

Thing I want to do before I turn 40

I found the Slytherin notebook my sister "gave" ( more like she had no choice but ) me and saw an entry I made a few years back. It had everything that i wanted to since 2011, maybe that's why I titled it Bucket List. Let me tell you the two reasons why I'm blogging about it now. First, carrying a notebook everywhere is 50% fun and 50% bulky so I'm keeping my records online (easy update). Second, I wanted to share it because the more people know, the best chance for me to get all the information I need to achieve it. :)

Here's the list in exact order when I wrote it down. Every time I complete an item on the list I will place a picture below it and update this blog so you too would know.

  • Go on a date
  • Get a new BlackBerry
  • Get a Passport


  • Apply for a Visa
  • Enroll in a Gym
  • Enroll in a French Class
  • Learn a New Language (Russian, German, Hebrew and more)
  • Travel to Places iv'e never been to
Dumaguete, Dipolog, Dapitan and Dakak


  • Travel Internationally
Thailand


  • Quit
  • Quit Smoking
Smoke Free for 8 months now


  • Minimize Rice intake
  • Lose weight
  • Get over GF_ (sooo stupid, I am actually hiding this.. hahaha.. sssshhh)
  • Get a Tattoo
  • Boycott Fast Food Joints
  • Save P10,000 and put it in the bank
  • Get New Clothes (preferably when your thin)
  • Go to Boracay 1 more time
  • Get a Massage
  • Boycott Carbonated Drinks
  • Spend the night at a Hotel
  • Travel Alone
  • Give yourself something special for your birthdays
Birthday 2013


  • Visit Pat-pat in Ilo-Ilo
  • Eat somewhere fancy
  • Take family on a fancy vacation
  • Apply and get a job outside the Philippines
  • Pay off Credit Card
  • Finish Loan
  • Take singing lessons
  • Buy a Laptop
  • Travel to Manila
  • Practice Wicca More
  • become a Hybrid in the Training World
  • Sit through a Play
Les Miserable, Facebooked, Sister Act the Musical and a few more local plays


  • Learn how to Surf
  • Bake a Cake
Mug Cake - It counts teehee


  • Wall Climb
  • Fly
  • Go Fishing and Catch Something
  • Host a Dinner Party 


  • Host Brunch
  • Throw knives like on Hunger Games
  • Be in a Play
  • Dance like there is no Tomorrow
  • Meet McFly (or any of the Band Members)
  • Meet the Cast of Harry Potter (or any one from the movie)
  • Take a picture from the outside of the Halliwell Manor
  • Meet the Cast of Friends ( Monica, Rachel, Phoebe, Joey, Chandler and Ross)
  • Learn Martial Arts
  • Shoot an arrow from a bow (lotsa times)
  • Fire a gun (safely) 

Saturday, September 7, 2013

ZEN - Work||Life Balance


If you feel that you're dragging yourself to work then 

you're doing it wrong.. Its not your work. Its you.


www.nearsightedowl.com -

#BalanceTips

1. When you go home, spend time with your family, they are the reason you're working. Don't sleep immediately.

2. Do random small projects that will make you proud of yourself. Although supporting your brother or sister financially is great, self fulfillment doesn't kick in till they graduate. Add small stuff like decorating you room or learning how to not burn fried eggs.t makes sense..

3. Visit places during days off that will not cost you much. Don't be a bum or a couch potato during Rest Days. Try going to Ayala, SM, Cmall, Emall, Park Mall, Mall Mall and all the words that ends with Mall.. They're free and it gives you the chance to meet someone you know randomly.

4. Don't be afraid to admit that life can sometimes be boring. It only stays boring if you want it to.


5. Have some alone time once in a while. You will only feel depressed when you have friends and don't know what to do on your free time. Why not focus on you and get a massage. *wink


6. Never forget to smile even if you have to fake it... It adds to your mood and it'll make your day a bit better.


7. And last but not the least. Never judge a co worker and question why they are in their position when they clearly don't know what they are doing. Why? Because your stressing yourself with something that you have no knowledge about. Cause if you did? You should have applied but didn't. Let them do their job and focus on not screwing up yours.

8. Smile. I said already but it makes sense..

Life's always better when you smile! :)

Monday, September 2, 2013

DIY: My Gossip Girl Inspired Room

DIY: Major Project for the Year


So around the second quarter of this year i decided to make my weekend a little bit more interesting than sleeping and eating (**wink). I remembered I love doing and making stuff on my own so I decided to recreate my room. Let me show you. 

so here's a picture of my room before I started this project


If you look at the picture, its pretty plain, bed on the floor, a Spongebob fleece blanket covering the window to avoid the sun (I'm a vampire that way.. lol). I was very ambitious. I wanted a Greek inspired room at the end of the process. Then I remembered how small my room was so I went to my passion, GOSSIP GIRL. (BIG Fan.. teehee). 

So my room was inspired from the homes of Manhattan's Elite. 

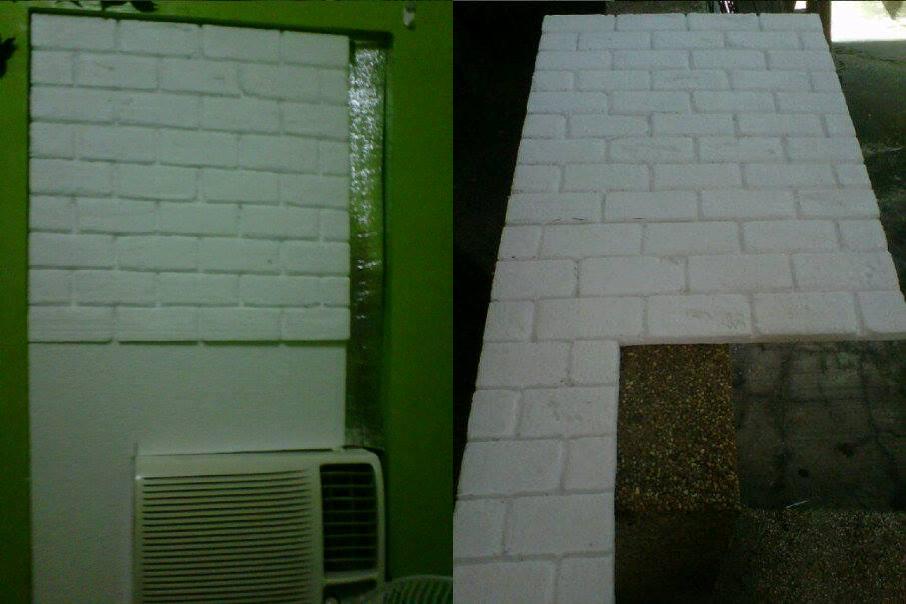
I started out by covering the window with cardboard, insulator and lastly Styrofoam (foam needs to be an inch thick - I'll tell you why in a bit). I glued them using a Glue Gun (please be careful, it gets crazy HOT). I then cut up butterflies in 3 sizes (small, medium and large) from black cartolina. This is the Serena van der Woodsen touch.


Comparison | Clearly it's not the same (but it is **wink.. teehee)

 The next step is a bit toxic so please make sure that you do this in open space and make sure that you have adult supervision if you are young. you will need the following things:


  • Soldering Iron
  • very long ruler
  • Markers
  • Sand Paper
  • Gray and Red Paint (make sure they are compatible with Styrofoams)
Ladies and Gentlemen, we are about to make Faux Bricks.

Use the markers and the ruler to make your brick lines and use the soldering iron to melt the foam along the lines, about half an inch deep. Use the sand paper to make the surface a little bit smoother and make those imperfections that old brick walls has. Here's what i did.

the one on the left is the first part then i completed the rest of the foam (was pretty proud at this point)

Use the gray paint in between those bricks as a lining (mortar i believe is what is called). then use the red paint to achieve the brick wall look.


Dan Humphrey's Loft inspired 
This was suppose to be my final designed but since i stopped using the AC (bill issue :p) the room felt like hell on earth. So i had to make revisions. 

So below is the final remodeling of my room with the GG motif. I have added a tarp of Lily Humphrey's RAINBOW GIRL that I will back frame to look authentic.


GG Room version 2.0

See you soon on my next adventure.. 

"There's no place like Home. So make your place feel like one" - ALIC in Wonderland