Showing posts with label DoItYourself. Show all posts

Thursday, May 8, 2014

Jade's Cook Book -Ravioli a la Pobre


Jade's Cook Book

Jade's Cook book is dedicated to our dog who inspired us for many years and made us happy when times were boring or sad. Jade was named after the four of us.

J - Jewel, A - Alic, D - Dirk, E - Eugene


Ravioli a la Pobre

Ingredients:

Dough - 
  •    2 Eggs
  •    1 Cup of Flour
  •    pinch of Salt
Filling - 
  • Sauteed ground beef/pork/chicken
  • Grated Cheese
Sauce - 
  • Del Monte Filipino Style Spaghetti Sauce

How To:

Mix the Eggs and Flour until it forms a dough. Roll the dough into a ball and set aside for an hour or two.


Using a rolling pin, roll the dough until its thin enough to cook but not too thin that it will break when you put the stuffing in.


Cut the dough in circles ( i used the bottom of a plastic water cup so the shape is wide enough. Mixed the meat and cheese together and place a teaspoon full of stuffing on one of the circles then place another one on top. To close the ravioli you can use a fork and it should look something like this


Make sure that when you close the ravioli you do not leave any air pockets. Leaving air pockets will cause the ravioli to bloat and pop while boiling. Taking a pot with water and boil the water with a pinch of salt and a table spoon of oil.


Heat the sauce and add any ingredients you prefer. add the cooked ravioli and voila! Enjoy.


Cooking Time : 3-4 minutes
Prep time: 20 mins
Dough: 1 hour and 30mins


Stay tuned for the following post:

Hong Kong Day 3: KidsRus - Hong Kong Disneyland
Madame Tussauds: The Wax Museum (The not so scary version)
Hong Kong Itinerary - Sister Made Stuff

Saturday, March 22, 2014

Sock Hamper in 30 minutes or less


Sock Hamper

Talking Points

Have you ever washed your clothes before and before washing them it smells like feet? Well smell no more! with the easy DIY Sock Hamper. 

With the revolutionary Sock Hamper you get the chance to separate those smelly sock you take off everyday and not place it in the same hamper you put your used clothes in. As an added bonus the Sock Hamper helps you avoid losing the other piece of the pair. Here's how you make one.


Things you will need:
  • a pair of old pants
  • needle
  • thread
  • scissors
  • a ring of sort 
  • little to no sewing skills
  • 30 mins from your day

DIY: 


Take a pair of jeans that you no longer use or does not fit you anymore and cut one of the legs
This is how it should look like after cutting one of the legs
invert the piece and sew the end part as well as the flapped opening

after sewing the ends and opening this is how it should look like when you flip it over
add the ring on the pointy end and voila - Sock Hamper


Enjoy your new Sock Hamper and stay tuned for more DIY project. 


Monday, September 2, 2013

DIY: My Gossip Girl Inspired Room

DIY: Major Project for the Year


So around the second quarter of this year i decided to make my weekend a little bit more interesting than sleeping and eating (**wink). I remembered I love doing and making stuff on my own so I decided to recreate my room. Let me show you. 

so here's a picture of my room before I started this project


If you look at the picture, its pretty plain, bed on the floor, a Spongebob fleece blanket covering the window to avoid the sun (I'm a vampire that way.. lol). I was very ambitious. I wanted a Greek inspired room at the end of the process. Then I remembered how small my room was so I went to my passion, GOSSIP GIRL. (BIG Fan.. teehee). 

So my room was inspired from the homes of Manhattan's Elite. 

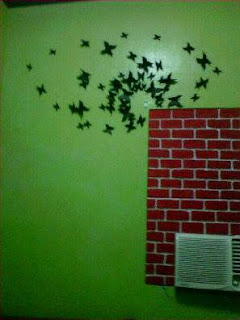
I started out by covering the window with cardboard, insulator and lastly Styrofoam (foam needs to be an inch thick - I'll tell you why in a bit). I glued them using a Glue Gun (please be careful, it gets crazy HOT). I then cut up butterflies in 3 sizes (small, medium and large) from black cartolina. This is the Serena van der Woodsen touch.


Comparison | Clearly it's not the same (but it is **wink.. teehee)

 The next step is a bit toxic so please make sure that you do this in open space and make sure that you have adult supervision if you are young. you will need the following things:


  • Soldering Iron
  • very long ruler
  • Markers
  • Sand Paper
  • Gray and Red Paint (make sure they are compatible with Styrofoams)
Ladies and Gentlemen, we are about to make Faux Bricks.

Use the markers and the ruler to make your brick lines and use the soldering iron to melt the foam along the lines, about half an inch deep. Use the sand paper to make the surface a little bit smoother and make those imperfections that old brick walls has. Here's what i did.

the one on the left is the first part then i completed the rest of the foam (was pretty proud at this point)

Use the gray paint in between those bricks as a lining (mortar i believe is what is called). then use the red paint to achieve the brick wall look.


Dan Humphrey's Loft inspired 
This was suppose to be my final designed but since i stopped using the AC (bill issue :p) the room felt like hell on earth. So i had to make revisions. 

So below is the final remodeling of my room with the GG motif. I have added a tarp of Lily Humphrey's RAINBOW GIRL that I will back frame to look authentic.


GG Room version 2.0

See you soon on my next adventure.. 

"There's no place like Home. So make your place feel like one" - ALIC in Wonderland